27 Aug Ice Cream Drip Cake
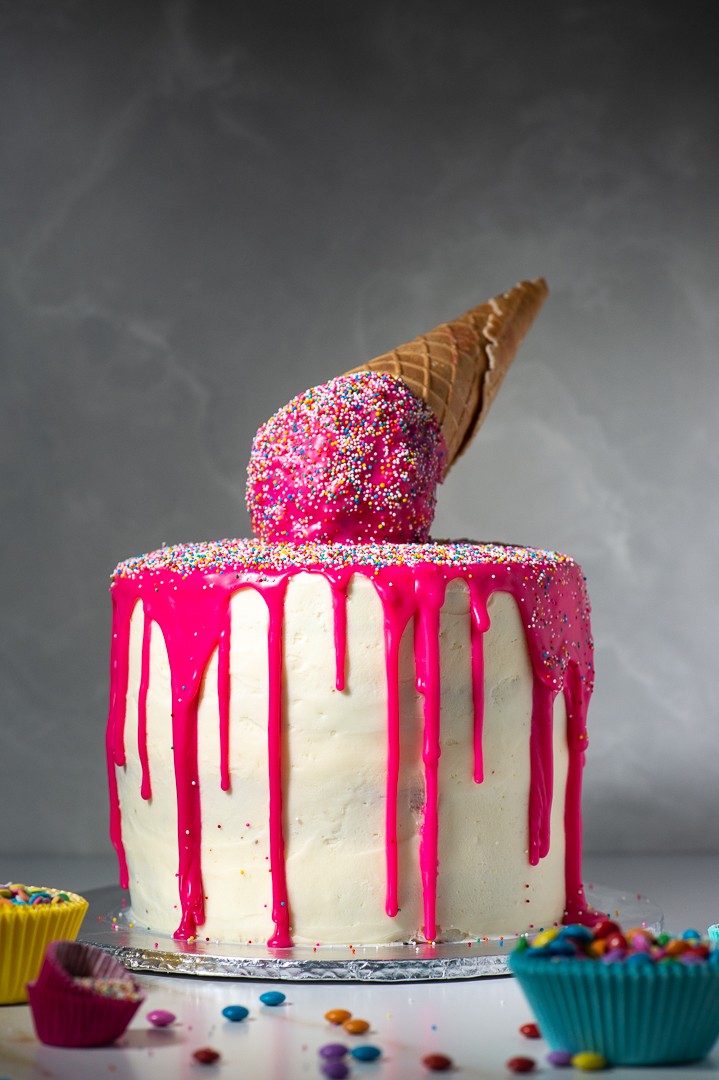
Ever since I spotted one of these beautiful Ice Cream Drip Cakes on Pinterest, I’ve been looking for an excuse to make one. Finally, the perfect occasion – my twin niece and nephew had their 3rd birthday party and Auntie Astrid was given free rein in making them each a cake! (Not pictured here is the equally beautiful blue version.) It was a delight to see their little faces light up at the sight of the cake, and oh did we have fun trying to explain it wasn’t actually ice cream in the cone!
Please don’t be intimidated about making this cake. It’s meant to look a bit messy so perfection is not the aim here.
A few tips to help you:
– Drip cakes need to be quite tall for maximum effect so it really is worth using a smaller diameter cake tin than usual – this also results in a slightly skinnier-looking cake. I used a 17cm tin and made 4 layers.
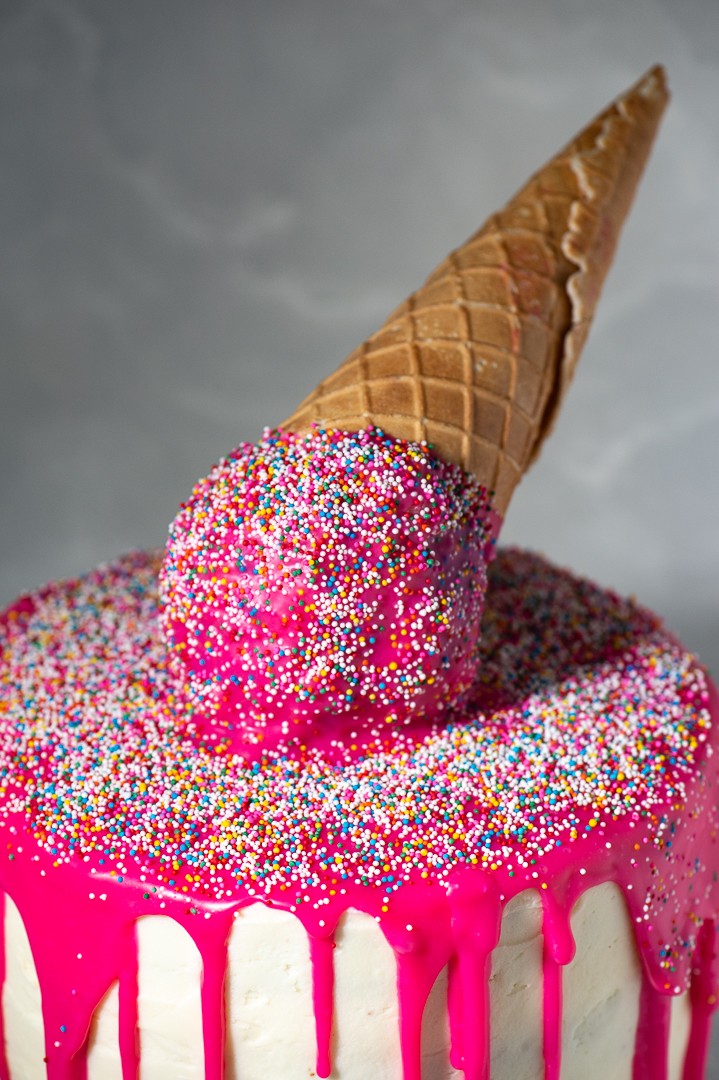
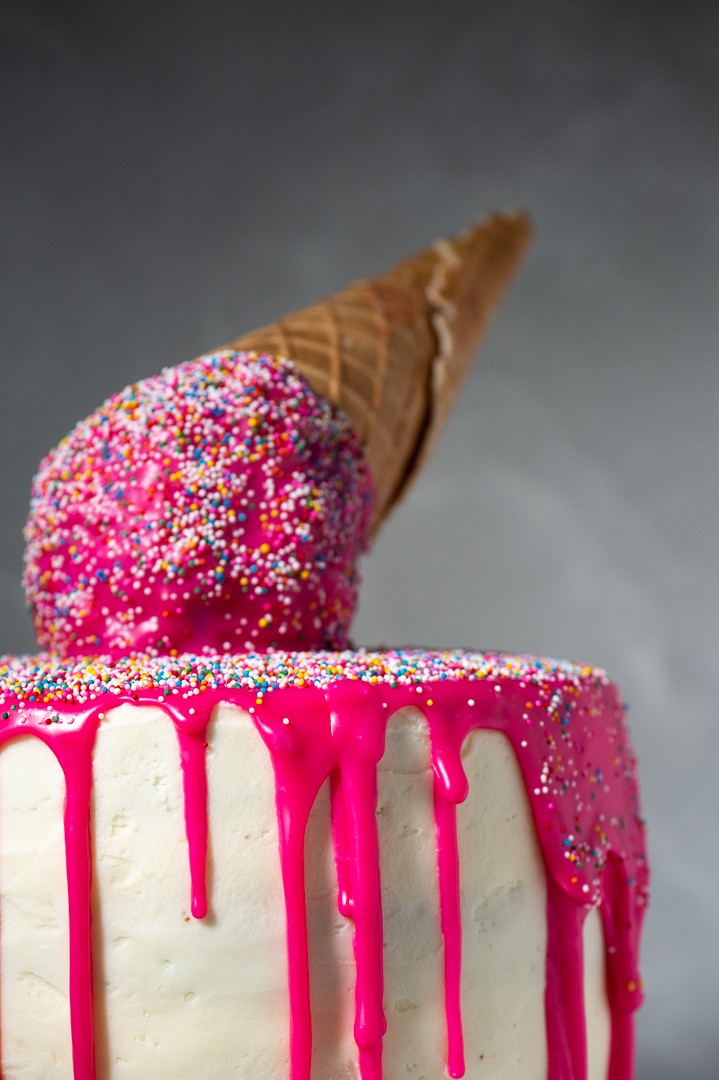
– The “ice cream” part is actually a cake pop, made from the scraps of trimming your cakes, and a little icing. Be sure trim the top of each cake quite generously so that you have lovely flat layers but also enough cake crumbs to form a good-sized ball.
– Lollipop sticks, ice cream sticks or even chopsticks are very helpful in stabilising the “ice cream” on top of the cake, especially if you need to transport it.
Ingredients:
For the Cake:
285g butter, softened
400g sugar
12,5ml vanilla essence
5 large eggs
525g flour
17,5ml baking powder
pinch of salt
325ml milk
For the Icing:
125g white margarine eg. Wooden Spoon, softened
275g butter, softened
750g icing sugar
10ml vanilla essence
2-3 tbs of cream or milk
food colouring, optional
For the glaze:
200g white chocolate
100ml cream
a few drops of gel food colouring
1 x waffle cone
2 lollipop or ice cream sticks
sprinkles, for decorating
Directions:
- Preheat the oven to 180°C. Grease and line 2 x 17cm cake tins with greaseproof paper.
- Cream together the butter and sugar until pale and fluffy, about 5 minutes.
- Beat in the vanilla essence, then the eggs one at a time, beating well after each addition.
- Sift the dry ingredients together, then add to the mixture in three batches alternately with the milk, mixing lightly inbetween and scraping down the bowl. Mix just until combined, do not overmix.
- Divide the mixture into 4 equal portions (I weighed the mixture to ensure each layer would be the same). Bake 2 layers at a time, for 25-30 minutes, or until a skewer inserted comes out clean. Leave to cool in the tin for 5 minutes, then remove to a cooling rack to cool completely. Repeat with the remaining batter.
- Meanwhile, make the icing. Cream together the butter and white margarine, then gradually sift in the icing sugar. Beat well until light and fluffy. Add in the vanilla, milk or cream and food colouring, if using. Place into a piping bag and leave at room temperature until ready to use.
- Once the cakes have cooled, use a bread knife to slice off the top “bump” of each cake making the cakes level. Reserve the excess cake and set aside.
- Sandwich the 4 layers together with a thick layer of icing between each cake, then do a crumb coat (as discussed on my Mirror Glaze post) on the outside of the cake. Refrigerate for at least 30 minutes.
- Take the excess cake and crumble it into fine crumbs. Stir in some icing, a tablespoon at a time, until the mixture comes together and can be shaped into a smooth ball. This is essentially a cake pop that will fit into the cone. Place a lollipop or ice cream stick through the middle and refrigerate until hard.
- Use the rest of the icing to ice a generous layer on the top and sides of the cake. Smooth it out as neatly as you can. Place in the fridge or freezer until ready to glaze. The cake must be cold before glazing!
- To make the glaze, heat the chocolate and cream together in a small bowl either in the microwave at 30 second intervals, or over a pan of simmering water. Stir frequently and stop heating as soon as the mixture is melted and smooth. Add food colouring as desired.
- When you are ready to decorate your cake, dip your cold cake pop into the coloured glaze, then push the lollipop stick into the middle of the cake, attaching the cake pop. This will keep the “ice cream cone” in place. Place the second stick into the cake pop at about a 45° angle, then place the opening of the cone against the cake pop (supported by the stick).
- Place the remaining glaze into a squeeze bottle or piping bag (snip of a small opening) and drip around the edges of the cake at intervals, squeezing more or less for different length drips. Finally pour a little glaze onto the top of the cake and use a palette knife to spread it evenly (you don’t actually want this to drip down the sides, as you already have your pretty drips!).
- Decorate the “ice cream” and top of the cake with sprinkles as desired. Refrigerate until ready to serve!

Yvonne de Pao
Posted at 13:01h, 03 OctoberLovely cake! But I couldn’t get my glaze your lovely pink. Which food colouring can I use to get the same colour? Thank you
Astrid
Posted at 14:08h, 04 OctoberHi Yvonne! I used a Barco powdered food colouring in Rose – used almost the whole tub :).
Zorada Swart
Posted at 19:09h, 04 MayMy husband loves cake and he loves ice cream so I want to try this one for his birthday! I’m curious, why do you use both butter and margarine?
Astrid
Posted at 23:03h, 16 MayHi Zorada! The margarine is more stable but the butter tastes better, so I like to use a combination of the two 🙂