
07 Sep Cupcake Bites
You may remember the Cake Pop craze which dominated the baking world a few years ago. I’m not ashamed to admit I jumped on that bandwagon with great enthusiasm. Bakerella, the inventor of the Cake Pop, remains one of my food heroes to this day. A Cake Pop is a mixture of cake crumbs and icing, rolled into balls, placed on a stick like a lollipop and dipped in chocolate. They are moist, delicious and a real delight to look at. I will say this though, they are rather a lot of work to make. For this reason, they are great for a special occasion when you really want to show off your baking skills!
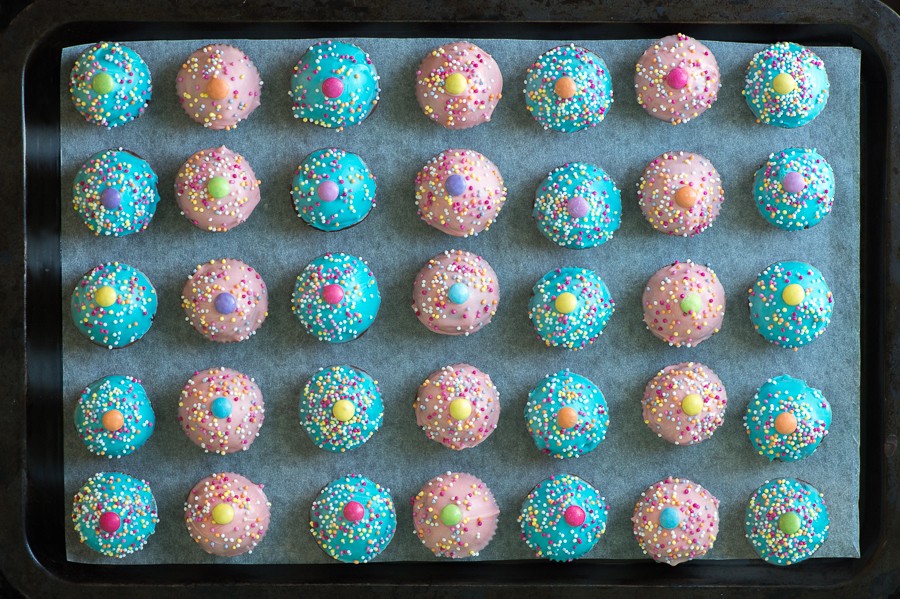
What I’ve made here are actually Cupcake bites (they’re not Pops unless they’re on a stick!). They look like tiny cupcakes and taste like sweet heaven. The shape of the cupcake wrapper on the bottom is formed by a plastic chocolate mould. After the bottom layer of chocolate has set, the top half of the cupcake bites are dipped into a different colour chocolate and decorated with sprinkles and mini Smarties to look like cupcakes.
Let me be clear about my feelings on cake mixes – I am not a fan. With just a little extra effort and time you get a much more delicious cake made from scratch. However, this is one instance where a cake mix works really well. There are two reasons for this – firstly you get a reliable, consistent end product and secondly it saves you time. Ditto for the ready-made icing/frosting. Spending less time making these means you have more energy to spend on the fun bit – decorating!

To make your life your life easier, here are some TIPS to read through before you get started:
– I find it easier to work in batches of about 10-12 at a time when making these. If you take all of the rolled cake balls out of the fridge at once, they will start to warm up and soften, making them very difficult to handle. Similarly the chocolate coating will start to harden after a while. Rather melt about a third of the Candy melts, dip and decorate 10-12 cupcake bites and keep the remaining cake balls in the fridge until ready to decorate. Then melt some more chocolate and continue with the next batch.
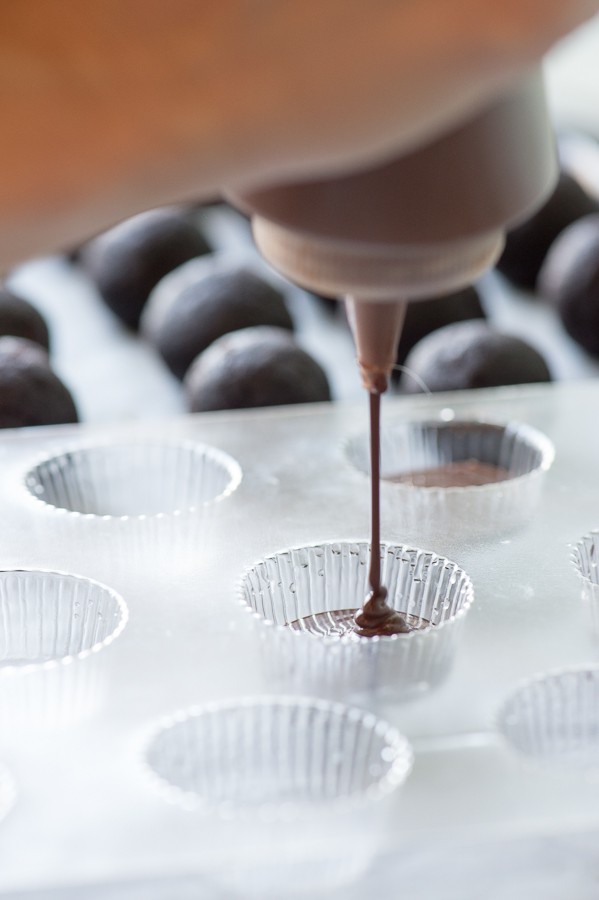
– I was lucky enough to find this chocolate mould in the UK, which worked perfectly. They are also available on Amazon in the US or UK (also known as peanut butter cup moulds, but the cavities should be close to 3.8cm for maximum cuteness). In South Africa your best bet would be The Chocolate Den, Value Baking Supplies or as a last resort you could use mini silicon cups.
– If you can’t find ready-made chocolate icing then make your own by beating together 250g softened butter, 500g sifted icing sugar, 100g sifted cocoa powder and 2tbsp of milk. Beat until smooth.
– Coloured Decorating Chocolate is available at some baking stores. You will achieve a similar result by using white cooking chocolate, but be sure to colour it with an oil-based or powdered food colouring (from baking stores). Regular food colouring from supermarkets is water-based and will cause the chocolate to seize.
– A plastic squeeze bottle is really useful to fill the chocolate mould cavities, as its easier to control how much chocolate you are adding and less messy.
– To avoid making fingerprints when handling the cupcake “wrappers” wear a pair of candy gloves. These are cotton gloves available at baking stores.
– Use a toothpick to touch up any little gaps or imperfections after dipping.
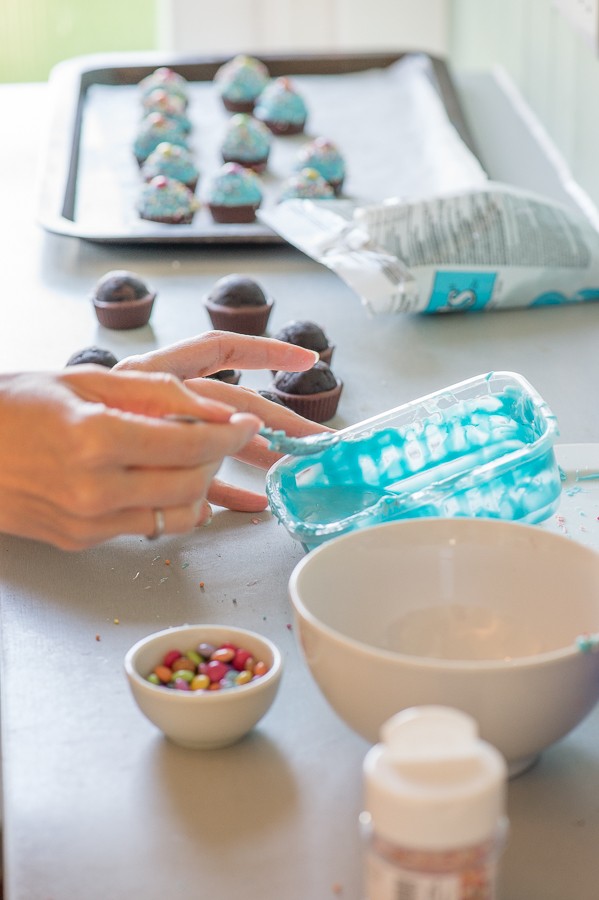
– When decorating with the 100’s and 1000’s, hold the cupcake bite over a bowl to catch the excess.
Ingredients:
(Makes about 36)
1 x box of chocolate cake mix (enough to make 2 x 20cm diameter chocolate cakes)
Eggs, oil and water as per cake mix directions
About 300g of ready-made chocolate frosting eg Pillsbury, at room temperature
250g cooking chocolate, milk or dark (2½cups)
340g Pink/Blue decorating chocolate or white cooking chocolate and a few drops of chocolate colouring (3 cups)
100’s and 1000’s or sprinkles
Mini Smarties or mini M&M’s (available from speciality baking stores)
1 x “candy cup” chocolate mould, with cavities about 3.8cm in diameter
Directions:
- Make the chocolate cake according to the directions on the box.
- Allow the cake to cool overnight at room temperature (a slightly stale cake is easier to crumble).
- Using your hands, crumble the cake into fine crumbs in a bowl. There should not be any large bits of cake remaining, only crumbs.
- Add half the icing and mix well. Gradually add more and mix until you have a firm mixture. If you add too much icing the cake balls will be too moist and fall apart.
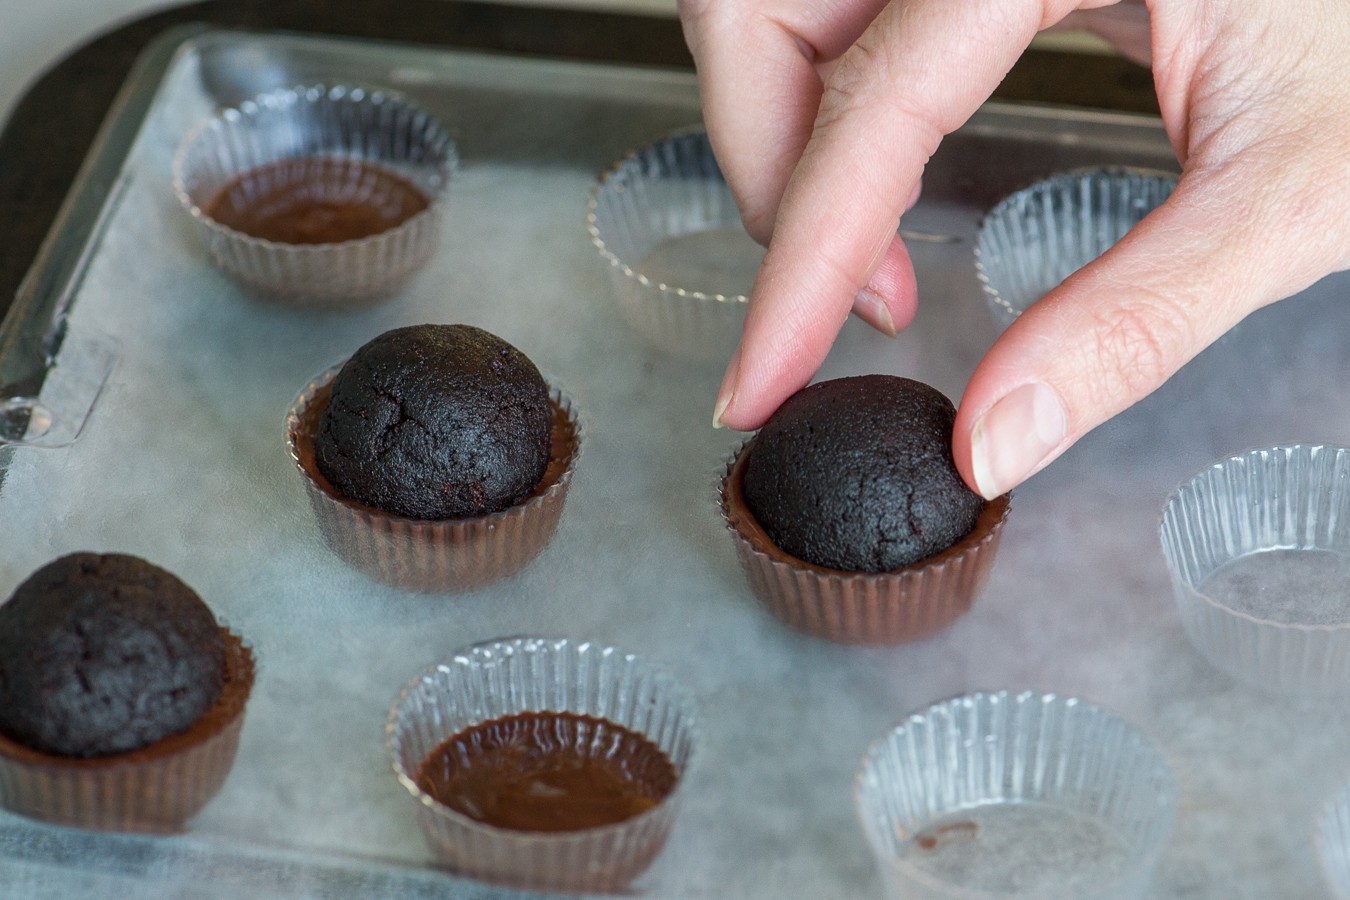
- Roll the mixture into balls about 3.8cm in diameter. To check the size, test to see that they will fit snugly in the candy cup mould.
- Place the rolled cake balls onto a plate or baking tray, and refrigerate for 3 hours.
- Melt the milk or dark chocolate (over a pan of simmering water or in the microwave). Add a little vegetable oil if the chocolate is too thick. Fill one cavity of the chocolate mould about halfway with the melted chocolate, then place a chilled cake ball in and push down lightly so that the chocolate runs up the sides (but doesn’t overflow). It may take a few tries to get the quantity of chocolate right.
- Repeat until you have filled all the cavities in the mould, then place on a tray or plate and freeze for a few minutes until set.
- Carefully remove the cake balls from the mould and repeat until all the cake balls have their chocolate cupcake wrappers. Keep refrigerated until you are ready for the next step.
- Now melt the Candy Melts (or white cooking chocolate and add a few drops of oil-based/powdered colouring to get the desired colour). Add a little vegetable oil if the chocolate is too thick. Holding the bottom of the cupcake bite, carefully dip the top into the coloured chocolate until it meets the “wrapper”. You have to work quickly or the “wrapper” will start to melt from the warmth of your fingers.
- Immediately push a mini Smartie onto the top and sprinkle with 100’s and 1000’s before the chocolate sets.
- Repeat with the remaining cupcake bites and leave to set at room temperature.
- Store in an airtight container either in the fridge or at room temperature.


No Comments